Monday, May 30, 2011

My year of knitting lacily.

Last week I started knitting a very nice baby blanket for a friend’s new Granddaughter. Mom and baby Gavin are home safe and sound, and truth be told, I should have started knitting this blanket sooner.

It’s a fun knit, using different colours of sock yarn with frequent colour changes. It goes quickly and is a small size as you can see from this picture. For a future one, I will mix this new yarn with some of my leftovers. Or alternatively, have some very fun socks!! 

This is the picture from Ravelry. As you can see, it's a "wee" one.
I realized once I got going on it that this is the forth lace project in a row. Not intentional, but not bad for someone who used to have a fear of lace. So that is why I am calling this my year of knitting lacily.

Before I started this blanket, I started on my second version of this vest called “Juliet”.
I did the first one in a variegated red yarn and liked it so much I decided to ravel a cotton vest (due to butt sag – the sweater, not mine). And I got a pretty good start on it before setting it aside for the blanket.
This is the picture of the original pattern from Ravelry.
This is the red one that is warm and cozy.
This is a teal cotton one that should be perfect for warmer weather.
And I have a “car lace” project, a simple drop stitch scarf that I am making out of leftover cotton from another project. I have about 3 and a half feet done, and will get back to it when the first baby blanket is done.

A simple pattern that is very nice in the variegated cotton.
It seems that all the brides whose weddings I attended within the past few years are having babies in the next while, so I see a few other blankets on the horizon. Maybe lace. Maybe not.

By the way, I found all of these projects on Ravelry.com. If you are not already a member, you should think about it, if you are a knitter. The blanket and the scarf patterns were free – two of thousands. The Juliet pattern was a pdf download for a very reasonable fee – I think $6. But since I am on my second one already, the cost is down to $3. (ya gotta love the logic).

Tuesday, May 24, 2011

How many people does it take to build a lightbox?

I have a new lightbox, and I feel like when I show a picture, it should have credits.
Without a number of people, its existence would not be possible.

Here it is - still awaiting staining or painting. I haven't decided which way to go yet.


Here's the cast of characters and the story of how it came into existence:

Light - Elaine (via Dylan)
Plexiglass - Sarah (via Sue)
Box - David (via Sue and Sarah)
Staining or painting - me

First of all the light - it came via my pal Elaine, when her son decided he no longer wanted his Coors Light sign. So, she donated it to me and I spent a number of hours figuring out how to remove the plastic Coors front to reveal just the light. If I recall (it was a while ago), I ended up with a good little scratch from the removal.

The light traveled here to the new home (not in a box) and I mentioned to Sue, one of my new students, what it was going to be when it grew up.  Sue brought her daughter Sarah to see the studio one day, and Sarah volunteered some Plexiglas from her workplace - she was sure there were leftover pieces that would be the right size and she would get one cut.

Enter Sue's husband and Sarah's dad - David - who was intrigued by the "light box" discussion and after learning its purpose, volunteered to build the box.

So, not only were a number of people involved, so were a number of locations: the light came from Toronto to Parry Sound. The plexiglass came from Oakville - it took a few trips to and fro before it made it here. And David's workshop, near McKeller, produced the light box.

It's fantastic. A very good size, so even large patterns will be easy to do in parts. And it means no more tired arms from tracing vertically on the living room sliding door. Yippee!!!!

You know that saying "It takes a village to raise a child." I'm starting to think that the same can be said about a light box. So thanks to all who helped create it.

Monday, May 16, 2011

Reinforcing Max

I finally got around to implementing my hanging solution for Max and the Gang. I stuggled with the best way to reinforce the back of the mat without making it too heavy or cumbersome. I am happy I waited a bit to let the solution percolate, but it definitely needed something to hold it flat so that it wouldn't curl.

Yippee for foam-core!!!! It's the other thing that, like velcro, I can't imagine what we did before having it.

I took a few pictures of the process of attaching the mat to the velcro boards. All very simple, once I figured out the solution.

I purchased three boards that were 2' by 3'. I turned them width-wise across the mat and trimmed off the excess, so they were flush with the sides. Luckily for me, the three boards fit perfectly top to bottom, with a little space between.

I used upholstery thread to sew through the mat and the board and carried long stitches behind. (not beautiful, but effective)

I made sure to get the stitches between the rows. I used a glover's needle and a thimble. I went down each side and across the top and bottom of the boards.

With the little space between, I can easily fold the mat for transportation.

Although you can't see a big difference, the mat hangs beautifully flat now - with a little help from some magnet strips across the middle and bottom boards.

I am so happy with the way that this turned out, I think I will do the same thing with a few of my smaller pieces. You can get the foam-core "acid free" and the local framing store said that they use it for archival framing, so I know it won't hurt the hooked piece. Plus with the big stitches only around the perimeter, it isn't cutting off any air supply.

Monday, May 9, 2011

A Practically Perfect Mothers' Day

Well, that describes my day - hope all you other Mothers had a great one.

Rick and I drove to Toronto to have Brunch-and-a-Movie with our kids. It was a beautiful day and kind of sad to spend it at the movies, but we didn't have a back-up plan and we really enjoy seeing movies there versus our little theatre here in town.

Eggs Charlotte is the brunch of choice for the Davis Family and we all ordered the same thing! And the movie choice was Thor in 3D, which was fun.

The weather was perfect for driving, which is always a good thing. And we even sprung for a deluxe car wash - inside and out - another thing that we can't get here in PS.

I think my favourite things were the homemade card from Laura and the flowers from Matt. It was a switch up this year, since Matt is the one who usually makes homemade. They are the only cards that I save - in a giant shoebox - that is sacred.

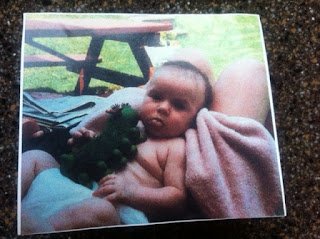
Here is Laura's card.

She was about 3 months old here and that caterpillar was her favourite chew toy.

And she's about 336 months here and that is a monkey finger puppet.
Ironically, I was working on a design for a new "bug" rug for next year's Annual and not completely happy with where I was. One look at this card and I now know EXACTLY what I am doing.

And here are Matt's flowers.

Notice the "bug" in here too - must be kismet.
After many hours in the back of the car, I sprung them and popped them into a vase. They immediately expressed their gratitude by opening and filling the kitchen with their wonderful smell.

I love being a mom - even when the mothering events are a little farther between. Mind you, they all seem to be enormous events now when they do occur - but I can't imagine my life without my kids.
And that says it all.

Monday, May 2, 2011

The "Girls" at the OCGH Annual.

Recovering from the Wedding and the trip to the other London this weekend. The wedding was definitely worth getting up early for, though I hadn't intended to do so.

Then I put the "Girls" in the car and headed to London, via Toronto. Elaine and I caught up in the car and the >5 hours of driving (both legs of the journey) went quickly.

Elaine helped set up the display, as did Wanda from North Bay. They immediately attracted a curious crowd, which kept up all weekend. Here is how they looked on display.


If you click on the images, (sorry they are a tad blurry) you'll be able to see some of the unhooked ones as well as the hooked ones. And if you want to see them up close and read the stories, go to www.thebraproject.com

I didn't take too many other pictures of rugs in the display. I always find it a bit overwhelming when there are so many. And this is the first year that I didn't have two days to walk the aisles and take pictures, so I had to make my decisions relatively quickly.

I also find the vendor booths a bit overwhelming and can never decide what to choose, which is probably a good thing. I didn't have a list this year, or a project for which I needed to shop.  I only picked up four pieces of dark greys, greens and near black wool for students; a pair of purse handles, some sari ribbon and sari yarn for a yet-to-be-designed bag for Barbados next year.

Here are a few of the pics I took. The first three are all works of a "new" hooker, who created all three in her first year!!!


And here are a few more of the rugs that drew my eye. I wasn't smart enough to get the names and details. If you are one of the artists, my apologies.

I can't resist the Group of Seven in any medium. This is gorgeous.

A beautiful stained glass pattern - apparently quite old.

Another classic that caught my eye.

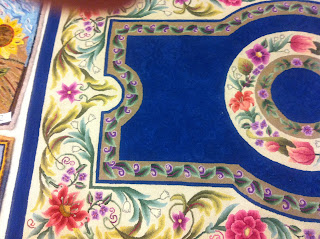
A portion of an amazing oriental - the borders were incredible.

Another amazing oriental - the workmanship is stunning

This one made me smile - but when you look closely, the detail is wonderful
I should have taken more pictures, but didn't. I also should have taken my better camera, which I will try to remember to do next year.

Anyway, a bit of eye candy to enjoy.

A Fun Top to Make. A Fun Mat to Hook.

 Yesterday I pulled the last few loops on this little 8 x 10 mat. It was inspired by an artist I discovered on Instagram. Her name is Debbie...